A stair can look flawless in a rendering and still feel “off” the first time you walk it. The usual culprit is the stringers. They are the structural side members that set every riser height, every tread depth, the pitch, and the way the stair meets landings. When stringers are fabricated well, the stair feels solid, quiet, and consistent underfoot. When they are fabricated poorly, you notice it immediately – uneven steps, squeaks, gaps, and awkward transitions to flooring.
Below is a clear, real-world look at the metal stair stringer fabrication process, written for homeowners and project leads who want a modern result without surprises. This is the workflow professional shops use to turn measurements and design intent into steel (or aluminum) that installs cleanly and passes inspection.
What a metal stringer really controls
Stringers do more than “hold the treads.” They lock in geometry and tolerances that determine comfort and safety. If the rise varies even slightly from step to step, people feel it. If the run is inconsistent, the stair becomes a trip hazard. And if connections at the top or bottom are underbuilt, you can get movement that telegraphs into railings, glass, and finishes.
A metal stringer also becomes an architectural line. In open-rise stairs, it is often the visual backbone, especially when paired with minimalist handrails or glass. That means fabrication has to satisfy both structure and aesthetics – straight lines, clean welds, intentional edges, and a finish that holds up.
Metal stair stringer fabrication process: the shop workflow
Every shop has its own preferences, but the high-performing ones follow a disciplined sequence. Skipping steps is where delays, rework, and budget creep usually start.
1) Site measurement and field verification
A tape measure and a quick sketch rarely cut it for metal stairs, because the stair ties into real conditions: slab heights, finished floor thickness, landing elevations, framing that may not be perfectly square, and walls that drift.
Professional measurement often includes verifying total rise (floor-to-floor), available run, headroom, landing sizes, and where the stair can actually anchor. If the project is a renovation, the measurement phase also checks what is hidden – slab edges, embedded steel, the condition of framing, and whether any demo will change reference points.
This is where “it depends” shows up early. A stair designed before the final flooring is selected can end up one riser short or one riser too many if finished floor heights change. Good fabricators ask those questions upfront so the stair feels right and meets code after finishes go in.
2) Design intent meets code and engineering
Stringers are structural components. Their thickness, section type, and connections depend on span, load, and how the stair is supported. A single center stringer behaves differently than two side stringers. A stair that lands on a steel beam is a different detail than one that bolts to concrete.
At this stage, drawings typically define:
- Number of risers and tread depths
- Pitch and nosing requirements (especially if the treads are wood or stone)
- Open-rise vs closed-rise approach
- Stringer type (plate, channel, tube, or fabricated box)
- Connection method at top and bottom (base plates, embed plates, bolts, welds)
- Coordination points for handrails, posts, or glass clamps
For projects that require permits or inspections, engineered review and stamping may be required, especially in commercial spaces or when the stair is a key egress path. Even when it is not strictly required, engineering review adds predictability – the stair is designed to perform, not guessed into place.
3) Job-specific shop drawings and client approval
This is the moment that separates custom fabrication from “hope it fits.” Shop drawings translate field measurements into buildable geometry, with dimensions called out for cut lengths, hole locations, and connection plates.
If you are a homeowner, this is where you confirm what you will see: the profile of the stringer, the way it meets the landing, whether treads sit on welded pans, angles, or brackets, and how clean the underside looks. If you are coordinating with a contractor, this is where you check interfaces – framing, drywall returns, tile edges, and railing attachment points.
Approvals matter because metal is not forgiving. Once cut and welded, small changes often mean grinding, rework, and refinishing.
4) Material selection and preparation
Most metal stair stringers are steel, typically mild steel because it welds well, machines cleanly, and finishes consistently. Aluminum can be used in some exterior or weight-sensitive applications, but it brings different welding requirements and can show distortion more easily.
Material prep includes verifying thickness, straightness, and surface condition. If the design uses plate stringers, the plate is selected to resist deflection and provide enough edge distance around bolt holes. If the design uses tube or channel, the wall thickness is chosen for stiffness and connection strength.
For exterior stairs, corrosion strategy is decided before cutting begins. Powder coating, paint systems, or galvanizing affect hole sizing, venting, and finishing steps.
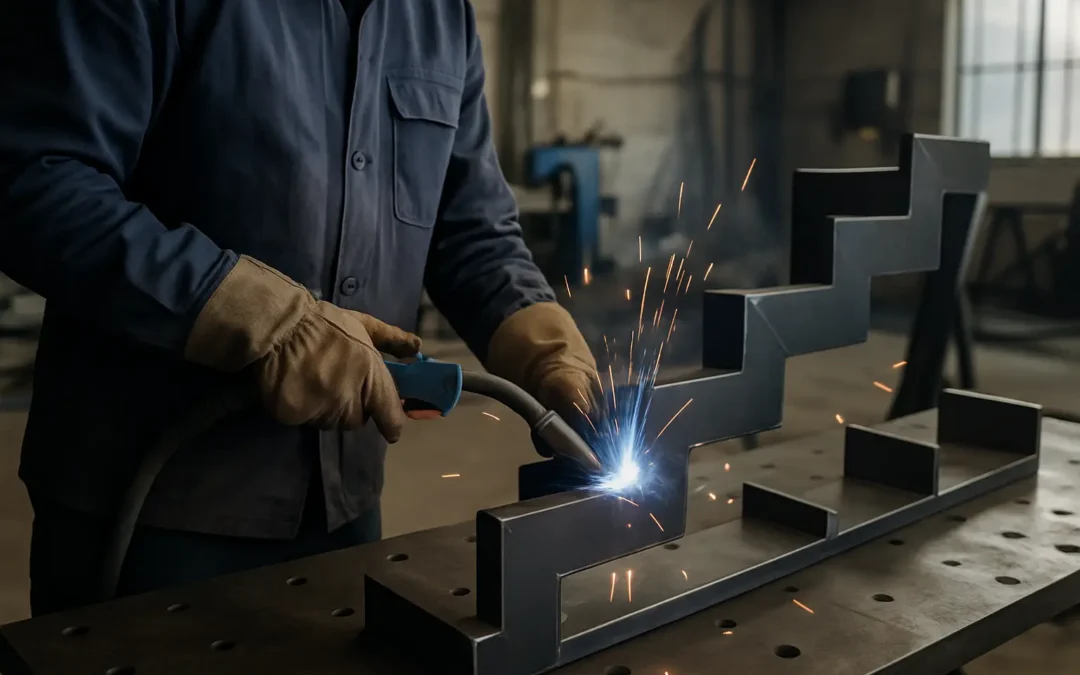
5) Layout, cutting, and machining
Once drawings are released, the stringer geometry is laid out for cutting. Depending on the shop and design, this can involve CNC plasma/laser cutting for plate stringers or precision saw cutting for tube and channel components.
Holes for bolts, anchors, and tread supports are drilled or CNC-punched. Accurate hole placement is not a small detail. It determines whether installation is a smooth bolt-up process or a day of site drilling and improvisation.
During machining, good fabricators plan for tolerances and real-world conditions. For example, slotted holes may be used in specific locations to allow minor field adjustment without compromising strength.
6) Fit-up and welding (where stairs are won or lost)
Fit-up is the dry assembly stage: parts are clamped in jigs, checked for square, and tacked. Only after verification does full welding happen.
Heat from welding can pull a stringer out of plane. Managing that distortion is part skill and part process – sequencing welds, using strongbacks or fixtures, and checking straightness repeatedly.
The weld approach also depends on the visual goal. If the stair is meant to look crisp and minimalist, welds may be blended and edges refined. If it is an industrial aesthetic, welds may be left visible but still need to be consistent and properly finished. Either way, structural welds must be sound. Pretty is not a substitute for penetration and strength.
7) Integrating tread supports and connection plates
Stringers rarely leave the shop as plain rails. They usually include tread angles, pans, tabs, or brackets, plus top and bottom plates that anchor into the building.
This is also where future railing work gets coordinated. If a glass railing is planned, the stringer may need welded plates for stanchions, threaded inserts, or reinforced areas where clamps will load the assembly. Thinking ahead keeps railings from becoming an afterthought that forces compromises.
8) Surface prep and finishing
Finishing is where the stair goes from “fabricated” to “architectural.” Prep typically includes grinding welds as specified, removing spatter, breaking sharp edges, and cleaning oils.
For interior stairs, powder coat is popular for its clean look and durability, especially in modern homes. Paint systems can also be used, and they may be easier to touch up after installation. For exterior stairs, the finish strategy needs to match exposure. Powder coating can perform well when applied correctly over proper prep, but coastal or high-salt environments may call for additional corrosion measures.
Stainless steel stringers are a different category. They can be beautiful, but fingerprints, scratches, and heat tint from welding must be managed intentionally. Stainless often costs more not just for material, but for labor and finishing discipline.
9) Pre-install check and delivery planning
Before a stair hits the jobsite, a professional shop checks critical dimensions again: overall rise, connection plate spacing, and tread layout. If the stair is large, it may be broken into shippable sections with bolted splices designed into the drawings.
Delivery planning sounds mundane, but it prevents expensive problems. Tight stairwells, elevators, and finished flooring all affect how and when the stringers can be brought in.
10) Installation, anchoring, and final alignment
Installation is not just “bolt it down.” Stringers need to be set plumb and true, then anchored into concrete, steel, or framing per the engineered or approved details.
Shimming may be used to achieve perfect alignment, but it should be controlled and intentional. Large gaps or improvised spacers can create movement and noise later. Once aligned, anchors are torqued, welds (if field welding is part of the plan) are completed, and interfaces are cleaned up so finishes sit tight.
Finally, treads are installed and the stair is walked and checked. If railings or glass will be added, installers confirm that posts, base shoes, or clamps land exactly where the drawings intended.
Common decision points that affect cost and timeline
Homeowners usually feel price differences most in three places: stringer style, finish quality, and site complexity.
Open-rise stairs with clean sightlines demand more precision and prettier fabrication, which adds labor. High-end finishes like flawless powder coat over perfectly blended welds require more prep time. And renovation sites often add coordination time because nothing is perfectly square and elevations can shift when old materials come out.
If you want to keep the project efficient, the best lever is early clarity. Finalize finish floor thicknesses, landing details, and railing intent before fabrication begins. That reduces change orders and keeps the install day predictable.
Choosing a fabricator who can carry it end-to-end
The metal stair stringer fabrication process only works smoothly when measurement, drawings, engineering coordination, shop work, and installation are treated as one workflow. When those pieces are split across multiple parties without clear accountability, gaps show up – sometimes literally.
At Iron & Glass Designs, our projects are built around that structured flow: site measurement, job-specific drawings, client approvals, engineer review when required, production, and on-time installation. If you are comparing bids, ask each shop how they handle those handoffs, because that is where stairs either stay on schedule or drift.
A good stair is the kind you stop noticing after the first walk-through – not because it is plain, but because it feels right every single time you use it. That is the standard worth building toward.