A staircase can look flawless in photos and still fail inspection for one small detail: a handrail that is just a little too high, too bulky to grip, or interrupted right where someone needs it most. That is why interior handrail code requirements deserve attention early, before finishes go in and before the permit clock starts ticking.
Most homeowners only think about handrails when they feel one is missing. Inspectors think about them when they see a fall hazard. And fabricators like us think about them as a functional design element that has to work with the architecture, the wall build-up, the stair geometry, and the way people actually move through a home or building.
Which “code” applies to interior handrails?
In the U.S., handrail rules usually come from the International Residential Code (IRC) for one- and two-family homes and townhouses, or the International Building Code (IBC) for commercial buildings and multifamily common areas. Accessibility requirements may also pull in ADA standards for ramps and certain stair conditions in public accommodations.
Here is the practical reality: even if your state or city adopts a version of IRC or IBC, local amendments and inspector interpretations can change details. If you are renovating an older property, there is also the question of whether you must meet current code everywhere or only in the altered area. That is a classic “it depends” scenario, and it is exactly why a measured site visit and job-specific drawings matter.
When a handrail is required
Interior handrail code requirements typically trigger based on the number of risers. Under the IRC, at least one handrail is required when you have four or more risers. That catches a lot of interior staircases that feel “short” but still count in the eyes of code.
In IBC settings, the requirement is often tied to stair width and occupant load, and you may need handrails on both sides. Multifamily corridors, amenity spaces, and commercial interiors can quickly move from a simple “one handrail” situation to a coordinated system that includes handrails, guards, and extensions.
Ramps are their own category. If you are dealing with an interior ramp, ADA and IBC rules frequently require handrails on both sides once the rise or length crosses certain thresholds. The key is not to treat a ramp handrail like a decorative grab bar – it must meet specific height, continuity, and extension criteria.
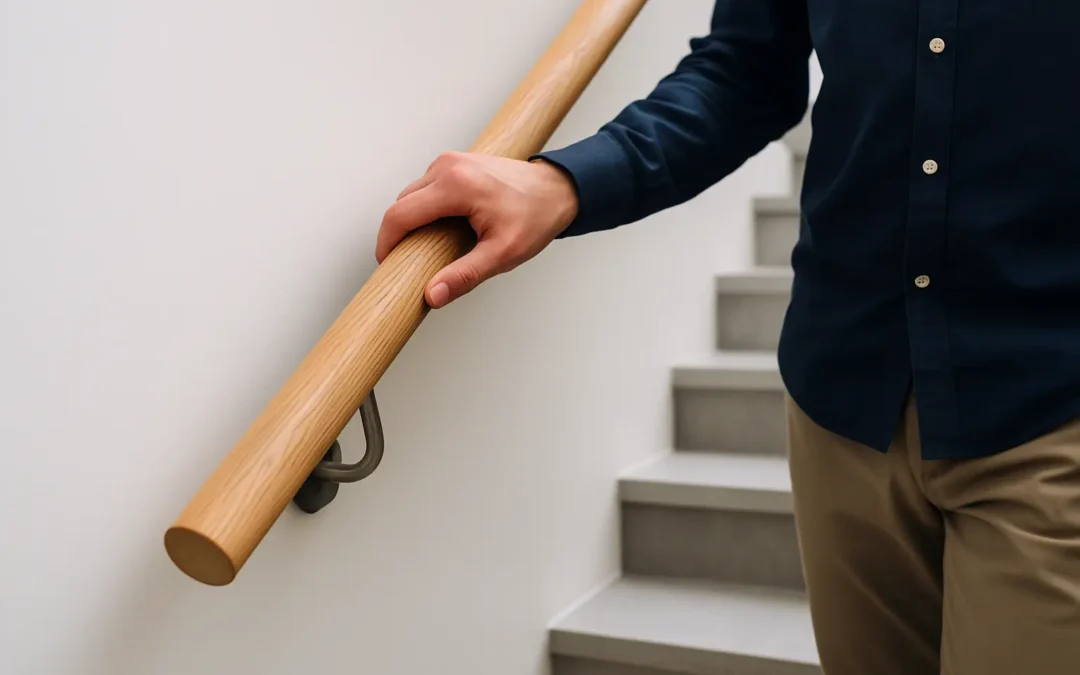
Handrail height: simple number, lots of ways to miss it
Height is one of the first things inspectors check because it is easy to measure and hard to argue.
For most residential stairs under the IRC, handrails are typically required to be 34 to 38 inches high, measured vertically from the sloped plane of the stair nosings to the top of the gripping surface. In many commercial applications under the IBC, you will see the same 34 to 38 inch range.
Where projects get tricky is how that measurement is taken and what counts as the “top.” If you choose a handrail profile with a broad flat cap, the top is obvious. If you choose a round or shaped profile, the top is still the top, but the real question becomes whether the profile is actually graspable at that height. Also, stair remodels often change the finished tread thickness, new flooring height at the landing, or the nose detail – all of which can move the measurement.
Graspability: the handrail has to be usable, not just present
A handrail is safety equipment. It has to be something a person can hold onto, especially in a slip or misstep.
Codes address this by defining acceptable shapes and sizes. Many inspectors want to see a circular handrail with a diameter roughly in the 1 1/4 inch to 2 inch range, or an equivalent “graspable” profile with finger recesses if it is not round. Wide, boxy profiles can look clean and modern, but if they are too large to wrap a hand around, they can fail.
This is one area where design and code should be developed together. If you want a minimalist look, you can often get it with a properly sized metal profile, a slim return detail, and clean brackets rather than oversizing the rail.
Clearance from the wall: small gap, big deal
People do not just touch a handrail – they slide their hand along it. That is why most codes require a minimum clearance between the handrail and the wall. A common baseline is 1 1/2 inches of clear space.
This requirement affects bracket selection, post placement, and how you handle tight stairwells where drywall returns, trim, or wainscoting eats up space. If the rail is too close to the wall, it becomes a knuckle-buster and can fail inspection. If it is too far out, it can reduce walking width and feel intrusive. The right detail makes it feel intentional, not like an afterthought.
Continuity: no “dead zones” where you need grip most
One of the most overlooked interior handrail code requirements is continuity. In plain terms, you should be able to keep your hand on the rail for the full run of the stairs.
Interruptions happen when a rail stops at a newel post, jumps around a window trim, or breaks at a landing without a clear transition. Some designs can be made continuous with smart geometry and returns. Others might require a different approach, like a wall-mounted rail that bypasses the post layout.
If your staircase has winders, split landings, or a turn, continuity becomes a design exercise. It is achievable, but it needs to be drawn, not guessed.
Returns and terminations: the part that prevents snags
Handrails typically need to “return” to a wall or terminate in a way that reduces the risk of clothing or bags catching on an open end. That is why you often see a rail curl into the wall at the bottom, or a clean return that closes the end.
In modern interiors, homeowners sometimes prefer an open-ended look because it feels lighter. The trade-off is that an open end can be flagged as a projection or snag hazard. If you want that modern aesthetic, talk through termination options early. There are clean, contemporary ways to satisfy the intent of the code without making the rail look dated.
Handrail vs. guardrail: related, but not the same
A handrail is the part you grip on stairs or ramps. A guard (often called a guardrail in everyday conversation) is the barrier that prevents a fall off an open side, like a stair edge, landing, or mezzanine.
Many projects combine the two – for example, a metal-and-glass guard with a separate graspable handrail mounted to the top or to the wall. The reason is simple: a top cap on a glass guard can be too wide to qualify as a handrail. Or the glass edge detail might not be shaped for grip. Designing them as two coordinated elements often gives you both the look and the code compliance.
Strength and attachment: what inspectors expect, and what owners feel
Even when a rail meets every visible dimension, it still has to feel solid. Codes require handrails and guards to resist specific loads. Inspectors may not calculate loads on site, but they will test by pushing and pulling. A rail that flexes, rattles, or feels loose raises immediate concerns.
Attachment depends on what is behind the finish. Drywall alone is not structure. Blocking, studs, steel stringers, or engineered anchors are what make a handrail dependable. This is another reason measurements are not just about length – they are about locating structure and selecting fastening methods that match the substrate.
Common inspection failures we see in real projects
Most handrail issues are not dramatic. They are small, expensive-to-fix details discovered late.
Height is the big one, especially on remodels where flooring changes the reference point. Clearance is close behind, particularly with decorative brackets that look great but do not provide the required standoff. Continuity and terminations are the next wave of failures, often caused by trying to reuse existing posts or stopping a rail short for visual symmetry.
If you are working with a contractor, designer, or building department, the fastest way to reduce back-and-forth is to treat the handrail as an engineered component. Field measure, produce drawings, confirm the code pathway (IRC vs. IBC and any accessibility triggers), then fabricate.
How we approach code-aligned interior handrails
At Iron & Glass Designs, we treat handrails the same way we treat complex railing systems: we start with a free site visit for accurate measurement, then develop job-specific drawings for client approval, and when required, we coordinate engineer review and stamping before production and installation. That workflow is not paperwork for the sake of paperwork. It is how you get a handrail that looks sharp on day one and still makes sense when the inspector shows up with a tape measure.
Planning tip: decide your “feel” before you decide your finish
If you take one practical step before choosing a style, let it be this: decide how you want the rail to feel in the hand. Do you want a warm, rounded grip? A crisp, modern metal profile that is still comfortable? A wall-mounted rail that disappears visually but is always there when you need it?
Once you get the feel right, the finish is the fun part. And when the rail is designed around code from the start, you do not have to choose between a clean interior and a compliant one – you get both, and the staircase becomes something you trust every time you use it.